Lost in a Jupyter Maze
- 4814 words
- Estimated Reading Time: 23 minutes
“Hey Sam, I’d like to learn how to program. Can you give me some advice?”
Hearing those words jars my brain. On one hand, it makes me happy. Programming is my favorite activity and the thought that someone is interested in the same thing that I love makes my brain tingle. But… I also know that programing can bring heartache. It can be maddeningly difficult to accomplish things that feel simple.
But why? Why is it so damn hard to climb the programming mountain?
This article is an effort to organize my thoughts around why it’s a challenge to go from zero to productive when writing software. To avoid boiling the ocean, I use the example of writing a Python program in a Jupyter Notebook. I’m writing from the perspective of doing development on a Macbook. Your mileage may very if you’re using something else.
Challenge #1: Planning your Journey#
My initial learning experience was a combination of college classes and teaching myself from books – this was all before the internet really took off. It was less than ideal.
The classes were part of a computer science curriculum. I’m glad I took them, but they were focused on aspects of computer science not learning how to program. The books were just whatever I could get my hands on. I started learning C++ and Java because I found books on the topic in a bargain bin.
The thing about programming though, is you never stop learning new things. Fast forward 20+ years later and I’ve gotten much better at learning new technology.
I took an unscientific survey across my friends and teammates that are coders and together we identified two main approaches.
- Leverage a tool/platform that allows you to ignore a lot of the more nuanced details and just focus on getting to something productive. Once you’ve gotten comfortable with writing a few working programs, backtrack to learn the supporting needs.
- Start at the most basic building blocks and work your way up.
I’ve done both, but prefer the latter. Programming leads to bugs. I spend more time reading and fixing code than writing code. Understanding the the nuts and bolts often prevent me from getting into too much trouble.
For the purposes of this article I’ll focus on what option #2 looks like.
Climbing a Maturity Curve#
The way I approach learning a new programming stack looks something like the image below.
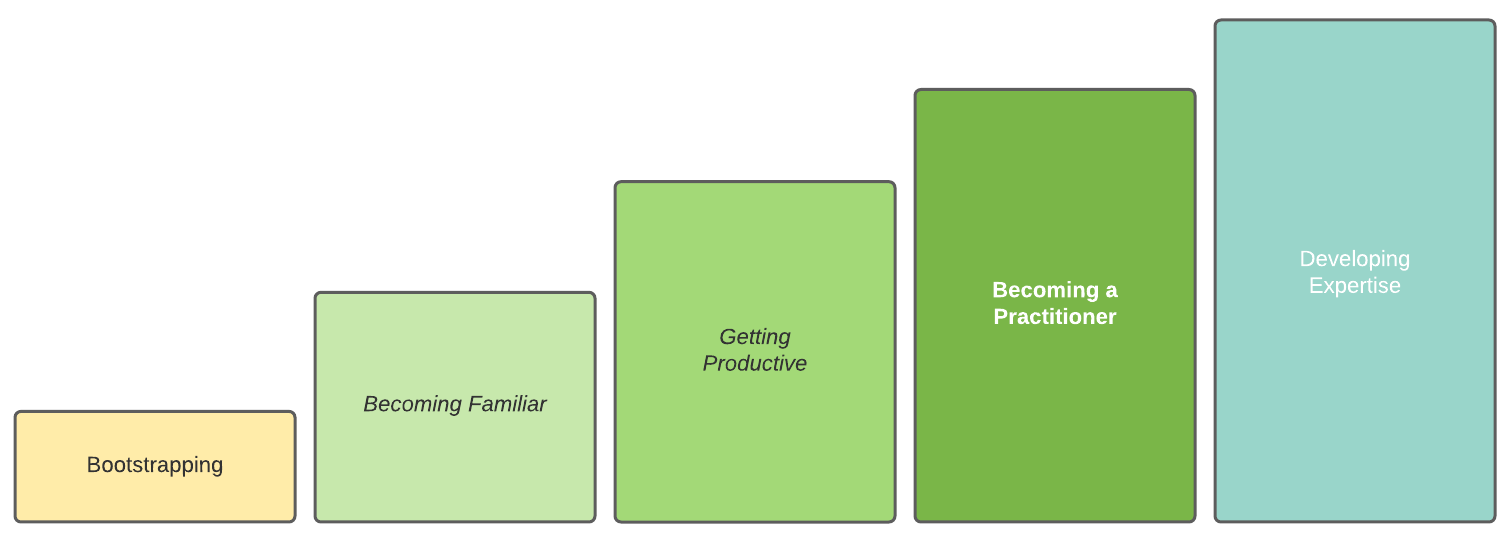
My process is:
- Bootstrapping: Focus on learning all of the supporting tooling (compiler, interpeter, linter, etc).
- Becoming Familiar: Learn the language syntax, related configuration files, write some very basic programs.
- Get Productive: Write useful programs. Learn the language features that make it standout.
- Become a Practitioner: Learn the things that a professional needs to do to ship production quailty code (testing, debugging, threading, logging, deploying).
- Develop Expertise: Focus on the details. Understand the nuances of the various aspects of the standard library. Performance trade offs.
Challenge #2: Hierarchy of Systems#
Where to start? That’s the first real decision I have to make when trying to learn a new development stack. For folks new to programming this is where the complexity can become overwhelming.
There is a misconception about computers – and machines in general. As a user, I see a computer as a device that can do a series of tasks. Browse the internet, play videos and music, run applications, and so on. This is similar to how I view a toaster. Bread goes in, toast comes out.
The thing is though, both a computer and a toaster are more than that. Most machines are really complex systems. They are a system that can perform a series of tasks that are composed of smaller systems. Those systems are often composed of even smaller systems. Systems all the way down.
How many different thoughts can you keep in your head at the same time? When trying to understand how a computer works, there are more internal systems than a person can realistically think about at any given moment.
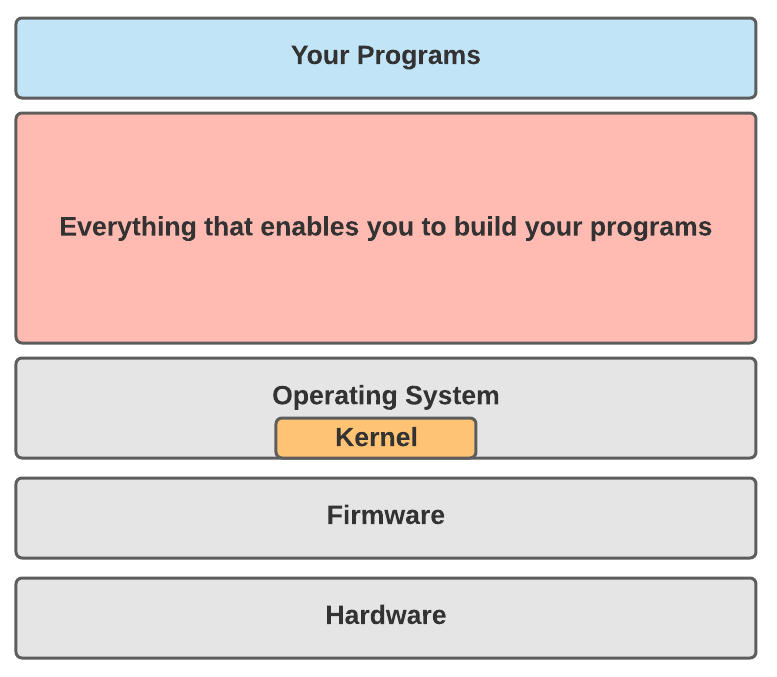
What is the right level to start at? For programming, it is usually whatever the first level is on top of the operating system. For a Python app, I think about it like this.
Challenge #3: Terminal Anxiety#
On one’s programming journey, the terminal may be the largest spiked pit that snares would be developers.

If you’re not familiar, the terminal is an application that enables a computer user to interact with the computer by typing. It is also referred to as the command line or console.
What is notable about the terminal is that it doesn’t have a user interface. All
work is performed by typing a series of commands. A classic example is this scene
fromm the 1983 film WarGames in which a kid accidentally sets off a nuclear crisis.
Fun trick, you can make your terminal talk like in the film clip. In a terminal window, type the following:
say "Shall we play a game?"
To really get started with the terminal go through a few tutorials.
I like this one (~30 minutes).
So we’ve established what the terminal is, what it’s used for, and pointed you to were you can learn how to use it. But why is it a source of frustration for would be developers? I think it comes down to two things:
- Safety
- Lack of a map
Safety#
By safety, I mean how confident the user feels when they do an action on the computer that they can recover from a mistake. A million years ago, I worked at an IT help desk at my university. When midterms or finals rolled around there was always a handful of students that approached me with tears in their eyes. They had somehow deleted/corrupted/lost their big project and needed help recovering it. Sometimes I could help, sometimes I couldn’t.
Some commands in the terminal are destructive. Meaning, they can’t be undone. This adds a bit of danger to using the terminal for a grizzled vet, that makes it kinda fun to use. To a novice though, it can have a paralyzing effect.
To overcome the feeling of working without a net in the terminal my advice is:
- Practice. The only way you’re going to hone your terminal skills is by using the terminal. If you’ve got multiple monitors, always have a terminal open in one of them.
- Don’t use rm and mv unless you know what your doing. The rm command deletes files. The mv command moves files. Most issues that crop up with the terminal are from accidentally deleting or moving the wrong things. Use the Finder app for that stuff until you’ve mastered the terminal.
- Write multi-step commands in a text editor, then when you’re ready to run them copy/paste into the terminal. It’s very easy to hit return/enter and run the command when you just wanted a new line.
Traveling without a Map#
When I hop in my car and drive to my local grocery store, I don’t think much about it. I’m familiar with the area and can reliably navigate my way there. It’s a different story if I’m going somewhere new. That situation calls for GPS and a mobile map app.
Navigating your computer with the terminal can feel like leaving the airport in an unfamiliar city. You need help finding your way around.
There isn’t GPS for the terminal, but there are commands that make it easier. The below table are the commands I use for navigating the terminal.
Handy Commands for Exploring
| The Command | What’s it Do |
|---|---|
| pwd | Displays where you’re at. Think of it like GPS. |
| echo $OLDPWD | Displays where you just left. |
| ls | Displays what’s in the current directory |
| cd | Changes the current directory |
| tree | Draws the current directory’s contents like a tree. |
Knowing what commands to use are half of the solution. The other half, is having a good mental model of how the computer’s directory structure is laid out. Each operating system has its own strategy for how files and programs are organized. Get familiar with your computer’s layout. For Macs, Apple has this introduction to their approach.
Have fun with the Terminal#
The last thing I want to say about the terminal is this. Taken as it is out of the box, it’s just boring. The terminal is an essential tool in my toolbox. Because I use it so much, I try to do everything I can to make it enjoyable to use.
Here are a few tips for making the terminal your own.
- Replace it. The terminal that ships with your OS probably isn’t the best one out there. Try out 3rd party terminals and find one you like. I use ITerm2. It provides must have features like mouse support, tabs, pane splitting, and background images.
- Use a good font. You don’t have to stick with the default font.
- Set the background and text colors to something that fits your personality.
- Use a theme app. To really crank up the power of what you can get out of the terminal, use a theme app. Theme apps enable customizing a variety of aspects beyond what’s possible with a terminal app. I use powerlevel10k.
- Finally, enable autocomplete on the apps that support it. This is a game changer.
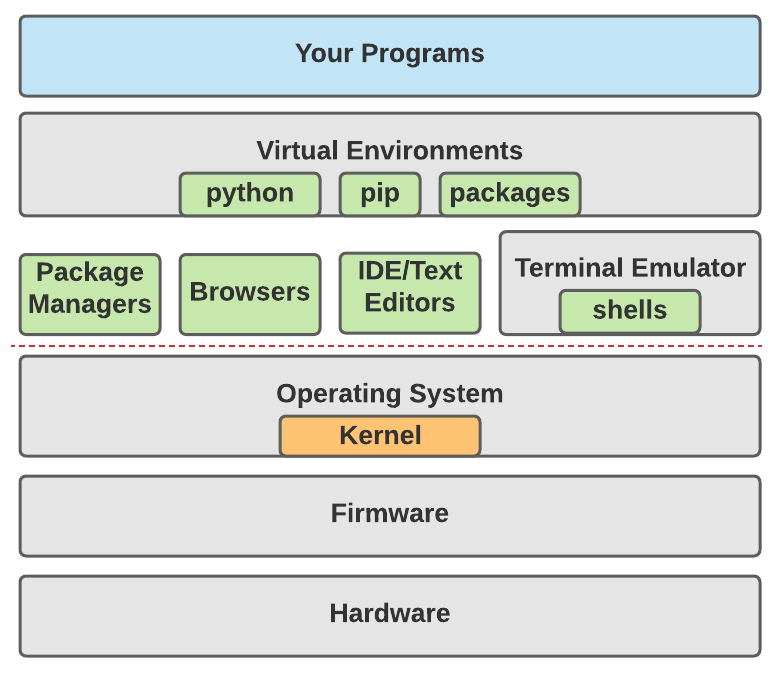
Challenge #4: The Install Chain#
The next challenge is understanding the web of interdependent things that are required
for working with the technology of choice. Lets’s look at what I use for creating
Python programs.
Package Manager#
The first system in our systems of systems is we need something to manage all of the various installs we’re going to have to do. Each application has its own way of being installed, but that can quickly lead to a mess. I highly recommend using a package manager. A good package manager standardizes installing, upgrading, and removing applications on your computer.
For the Mac I use Homebrew. Follow the instructions on the Homebrew site to set it up. The rest of my examples leverage Homebrew.
Coding Environment#
For development we need an app to write code in. I do most of my work in VSCode and I recommend it. VSCode has an embedded console that enables running terminal commands. It’s great, but I also like to have a dedicated terminal open on a separate monitor. For that I use ITerm2.
Both of these apps can be install via Homebrew with the following terminal commands.
# Open the default Terminal app and run these one at a time.
# 1. Install VSCode
brew cask install visual-studio-code

# 2. Install iTerm2.
brew cask install iterm2
Python Tooling#
There are multiple aspects to developing a program. Setting up a project structure, managing dependencies, running tests, bundling, and deploying. My experience has been that every language has multiple options for how this can be done. For Python development I prefer poetry.
I can’t recommend poetry enough. It removes most of the complaints I had about working in Python before I discovered it.
Poetry itself is a bundled Python application. I could it install it with Homebrew but I tend to manage all of my Python applications with pipx. pipx is like Homebrew but just for Python applications.
You can setup both poetry and pipx with the following commands.
# 1. Open up iTerm2 if you installed it earlier.

# 2. Install pipx with Homebrew.
brew install pipx
pipx ensurepath

# Enable autocompletions with pipx
pipx completions

# 3. Use pipx to install poetry
pipx install poetry
Tracking Changes#
Have you ever collaborated on a document with multiple people? Word processing apps provide features that help track the history of the document. Enabling the authors to see who changed what and even revert back to an earlier state if needed.
I need the same capabilities when writing code. For change management I use git. Git is a joy to use. Or rather it’s a joy to use now, since I’ve been use it for at least 10 years. When I was learning it though, it was like using a chainsaw with no owners manual. Very scary…
Fortunately for you, there is a large community of creative people who want to make learning git easier and even fun. A few options are:
- Study the Official Docs (not that fun)
- Read a Book (better)
- Use a visual guide (insightful)
- Interactive Tutorial (kinda fun)
- Read a Web Comic (officially fun)
- Enjoy some Cat Doodles (just silly)
Another aspect to change management is backing up my work. For that I use GitHub. GitHub is an online service provided by Microsoft that is basically git hosted in the cloud. I can upload – aka push – changes to GitHub using the local git app.
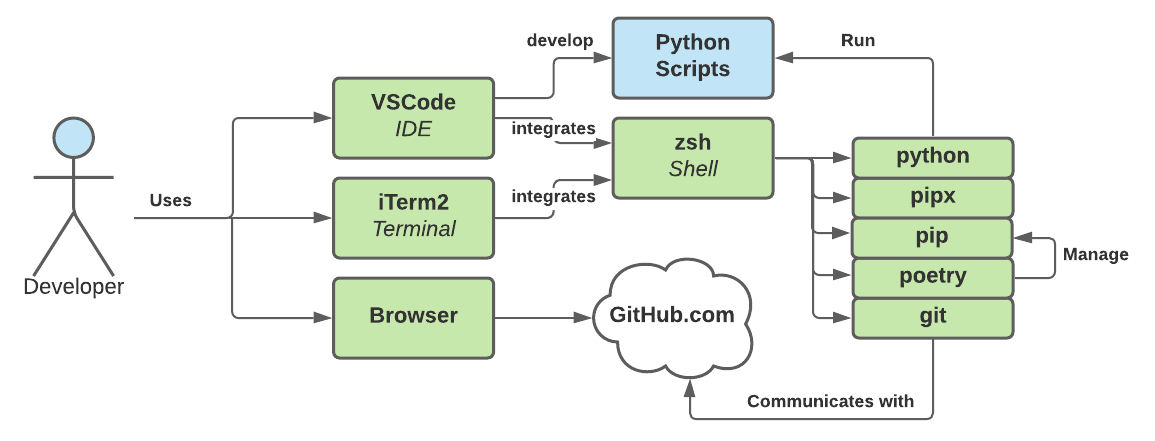
Starting to feel overwhelmed yet? We haven’t even started thinking about programming but we’ve got 6 new things to get familiar with. Don’t give up. This highlights why it’s so hard to get started with programming. You should understand it’s not just you. Everyone hits this wall eventually when they’re getting started.
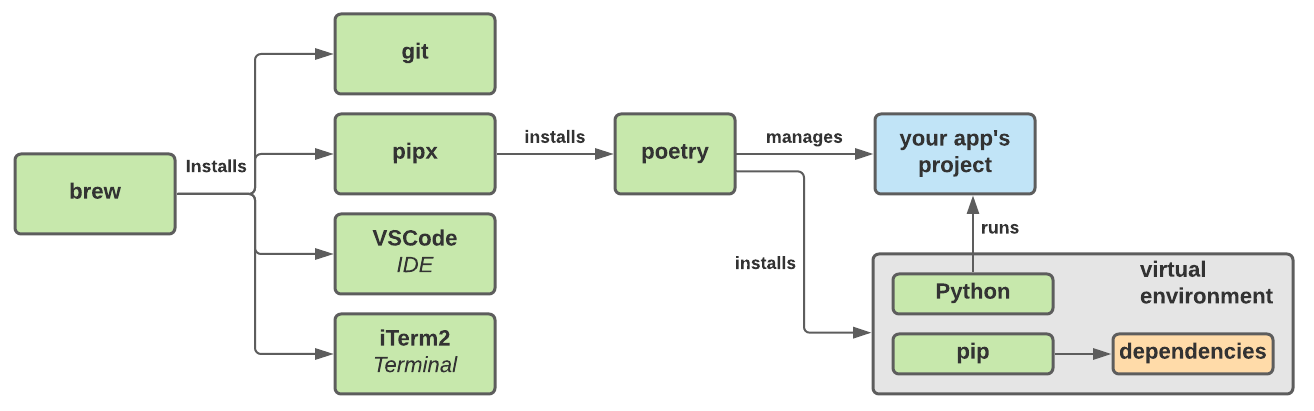
To help make sense of all this, here is a diagram of all the tools we’ve installed and how they interact.
Challenge #4: Building a Social Safety Net#
The last obstacle I want to highlight is a social one. Programming is often a solitary activity. But that doesn’t mean you’re completely on your own. I’ve been writing software for a relatively long time and I still get stuck on an embarrassingly frequent basis. To that end, I want to share how I go about getting help.
Where I go for Help#
The Web
My first stop in seeking out help is StackOverflow. It’s by far the most useful Q&A site I’ve found. A great aspect of StackOverflow is that the site’s model has been replicated to a large variety of other topics. If I have a question specific to algorithms, math, computer setup, or really anything, there is probably a Q&A site dedicated to it in the StackExchange network.
It a Q&A site doesn’t help, the next thing I tend to do is to look for examples of other people’s code on GitHub. Reading other people’s code is a great source of inspiration and clarity.
It there is a specific package I’m having issues with that project chances are the project tracks bugs using GitHub Issues.
It the issue is related to building something for the web I haven’t found a better source of documentation than Mozilla’s MDN site.
My Library
If the web isn’t helpful, I look to my bookshelves. Over the years I’ve built up a rather powerful collection of books. Good programming books can be pricey but the value they add over time is greater than the initial cost.
My Peers
If I’m really stuck I raise my hand and ask for help. I work remotely so that is done using tools like IRC, Slack, and Discord.
Don’t be a Martyr or Pest#
Now regarding, asking for help I see newbies making one of two mistakes.
- They languish for hours and make themselves miserable.
- They keep pestering the same person with too many questions.
Obviously we need to find a balance. You don’t want to waste time being a martyr but you also don’t want to risk alienating your friends and co-workers.
My general rule of thumb is this:
Don’t ask for help before spending an hour on trying to solve it yourself.
Don’t spend more than an hour with no progress before asking for help.
Do take the time to craft a good question.
Don’t ask the same person more than one follow up question.
An Example: Drawing a Maze#
Enough with the general advice. Let’s look at some actual code. Since it can feel like being lost in a maze when trying to lean how to program I thought it would be fun to write a simple maze generator.
Now, right out of the gate, you’re probably going to find this frustrating. The things you need to understand the following code are:
- A working knowledge of the Python language syntax.
- Know what a Jupyter Notebook is.
- Understand these Python concepts: Functions, Classes, List, Dict, Enum, Tuple, Named Tuple.
- The Stack data structure.
Don’t panic. This is an opportunity to be exposed to a bunch of new concepts. You don’t have to understand everything all at once.
I’m going to break the example down into it consumable chunks. However, you can grab the entire working project from its code repo using git. This is an excuse for you to try out some of those new git commands you’ve been learning.
The Project’s Structure#
I built the project using poetry. That handles defining the top level structure and dependency management. The way I create a new project is to run this:
# In the terminal...
# 1. Create a directory called mazes
mkdir mazes

# 2. Change into the new directory
cd mazes

# 3. Use the poetry wizard to create the project
poetry config virtualenvs.in-project true
poetry init
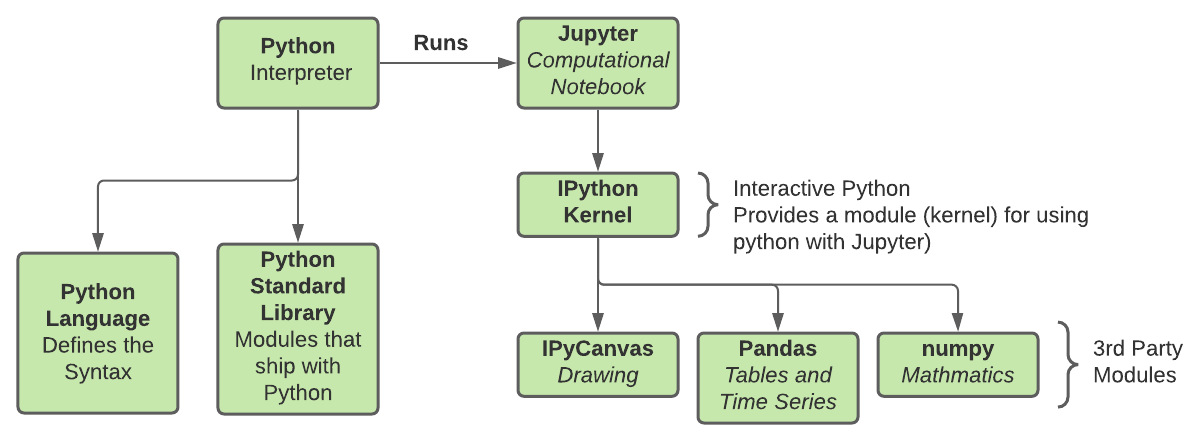
For my implementation I use the following dependencies:
| Module | Purpose |
|---|---|
| jupyter | A notebook environment for doing interactive development. |
| ipykernel | Required for Jupyter to work with Python. |
| ipycanvas | A python implementation of the HTML Canvas API. Used for drawing. |
| pandas | The maze doesn’t use this, but I used it for debugging. |
| numpy | Used with pandas. |
An overview of how the various components interact is drawn below.
The Main Function#
Every program has an entry point. Sometimes this is referred to as the main function. Since we’re working a Jupyter Notebook there isn’t a main function per say, but there is a top level cell that defines the core of the program. It is:
maze: Maze = Maze(40, 40)
generate_maze_walls(maze)
canvas = Canvas(width=800, height=800)
canvas = draw_maze(maze, canvas)
display(canvas)
That doesn’t look like much. Let me break down what each line does.
# 1. Create a 40 by 40 grid of rooms. Each room is completely walled in.
maze: Maze = Maze(40, 40)

# 2. Carve a maze out of the sealed rooms by knocking
#    down some walls.
generate_maze_walls(maze)

# 3. Create a 2D canvas to draw the maze on.
canvas = Canvas(width=800, height=800)

# 4. Draw the maze onto the canvas.
canvas = draw_maze(maze, canvas)

# 5. Render the maze on the screen.
display(canvas)
The Abstract Data Types#
Now in order to make the above main functionality happen we need some basic building blocks.
I’m trying to draw a maze in two dimensions. To stay consistent, I use the variable x to represent the horizontal axis and y for the vertical axis. In this first snippet, I create a data structure that represents a Point(x,y).
We’re going to need rooms and rooms have corners so to make the code more readable, I create an alias for Point named Corner.
"""
Convenience tuples for working with cell coordinates.
"""
Point = namedtuple('Point', ['x','y'])
Corner = Point
The next thing to simplify the code and improve readable is to define an enumeration for the directions of 2D maze. I also create a mapping of the directions opposites using a Python dict type.
class Direction(Enum):
  NORTH = 'NORTH'
  EAST = 'EAST'
  SOUTH = 'SOUTH'
  WEST = 'WEST'

DIR_OPPOSITES: dict[Direction, Direction] = {
  Direction.NORTH : Direction.SOUTH,
  Direction.SOUTH : Direction.NORTH,
  Direction.EAST : Direction.WEST,
  Direction.WEST : Direction.EAST
}
The maze is composed of a series of interconnected rooms. Each room has 4 walls. To represent a room I define a class called MazeCell. Why did I name it MazeCell and not Room? That’s just one of life’s great mysteries.
A MazeCell is composed of a location (think lat/long), 4 walls, and an indicator to convey if the cell has been visited before during the maze creation process.
"""
Represents a traversable room in a maze.
"""
class MazeCell:
  _location: Point
  _walls: dict[Enum, bool]
  _visited:bool

  def __init__(self, x: int, y: int) -> None:
    self._location = Point(x,y)
    self._walls = {
      Direction.NORTH: True,
      Direction.EAST: True,
      Direction.SOUTH: True,
      Direction.WEST: True
    }
    self._visited:bool = False

  @property
  def location(self) -> Point: return self._location

  @property
  def north(self) -> bool: return self._walls[Direction.NORTH]

  @property
  def south(self) -> bool: return self._walls[Direction.SOUTH]

  @property
  def east(self) -> bool: return self._walls[Direction.EAST]

  @property
  def west(self) -> bool: return self._walls[Direction.WEST]

  def visit(self) -> None:
    self._visited = True

  @property
  def visited(self) -> bool:
    return self._visited

  def remove_wall(self, wall: Direction) -> None:
    self._walls[wall] = False
The last building block before we create the maze itself is the Stack class. A stack is a data structure that enables queueing items to be worked on later. It characteristically has the behavior of the first thing we place in it is the last thing that will be removed. The stack will come in handy when we write the maze generation algorithm.
class Stack:
  """
  A FILO Queue built with collections.deque (Double Linked List).
  """
  _data: deque
  def __init__(self) -> None:
    self._data = deque()

  def push(self, cell: MazeCell) -> None:
    """
    Adds a point to the top of the stack.
    """
    self._data.appendleft(cell)

  def pop(self) -> Optional[MazeCell]:
    """
    Returns and removes the last item added to the stack.
    If the stack is empty then the function returns None.
    Check with "if val is not None: ..."
    """
    return self._data.popleft() if len(self._data) > 0 else None

  def empty(self) -> bool:
    """
    Returns True if the stack is empty.
    """
    return len(self._data) == 0
Building a Grid of Sealed Rooms#
Now that the basic building blocks of Point, Corner, MazeCell, and Stack are defined, I need to represent the maze itself. To do that I created the Maze class.
The maze is represented as a 2D grid of MazeCells. When a new instance of the Maze class is instantiated, the populate() method is called. This builds the 2D grid of maze cells. Each cell – or room – initially has four sealed walls. Later, the maze generation algorithm will open some of the walls, creating a maze pattern.
In addition to the populate() method, the Maze class also has two convenience methods. The method cell(point) finds a cell in the maze by its x,y location while the find_neighbors(point) finds all of the cells connected to a specified location.
class Maze:
  """
  Represents a maze of connected cells. A "cell" is simple a space a person could occupy.
  """
  _grid: List[List[MazeCell]]
  _width: int
  _height: int
  starting_cell: MazeCell
  exit_cell: MazeCell

  def __init__(self, width: int, height: int) -> None:
    self._grid = []
    self._width = width
    self._height = height
    self._populate()

  @property
  def width(self) -> int:
    return self._width

  @property
  def height(self) -> int:
    return self._height

  def _populate(self) -> None:
    """
    Builds a rectangular grid of cells in which all the walls are initially closed.
    """
    for y in range(self.height):
      row: list[MazeCell] = []
      for x in range(self.width):
        row.append(MazeCell(x,y))
      self._grid.append(row)

  def cell(self, location: Point) -> Optional[MazeCell]:
    """
    Finds a cell in the maze by its x,y coordinate.
    The origin of the 2D grid (0,0) is the upper left corner.

    Returns:
      Returns an instance of a MazeCell if it exists, otherwise None.
    """
    found: Optional[MazeCell]
    if (location.x < 0 or location.x >= self.width) or (location.y < 0 or location.y >= self.height):
      found = None
    else:
      found = self._grid[location.y][location.x]
    return found

  def find_neighbors(self, cell: MazeCell) -> Dict[Direction, MazeCell]:
    """
    Finds a given cell's neighbors.
    """
    cell_loc = cell.location
    north = Point(cell_loc.x, cell_loc.y - 1)
    east = Point(cell_loc.x + 1, cell_loc.y)
    south = Point(cell_loc.x, cell_loc.y + 1)
    west = Point(cell_loc.x - 1, cell_loc.y)

    # Note: For cells on the border, some neighbors will return None.
    neighbors: dict[Direction, MazeCell] = {
      Direction.NORTH : self.cell(north),
      Direction.EAST : self.cell(east),
      Direction.SOUTH : self.cell(south),
      Direction.WEST : self.cell(west)
    }
    return neighbors
If we run the code we’ve got so far, the graphic isn’t very interesting but we can confirm that we do in fact have a grid of cells.

Carving a Maze#
Finally, we get to the fun part. For generating the maze, I choose to use the recursive backtracker algorithm. Now that Stack class is going to come in handy.
This is how the recursive backtracker algorithm works (when implemented with a stack):
- Choose an initial cell in the grid,
mark it as visited and
push it onto the stack. - While the stack is not empty:
- Pop a cell from the stack and make it the current cell.
- If the current cell has any neighbors which have not been visited:
- Push the current cell to the stack.
- Choose one of the unvisited neighbors at random.
- Remove the wall between the current cell and the chosen cell.
- Push the current cell back on the stack (back tracking)
- Mark the chosen cell as visited and push it to the stack.
Here is how I implemented the algorithm.
import random

def generate_maze_walls(maze: Maze) -> Maze:
  """
  Traverses the grid of cells creates a maze by opening walls in place.

  Returns:
    The modified grid.
  """
  stack = Stack()

  # Establish the starting cell.
  starting_cell_loc: Point = Point(random.randint(0, maze.width - 1), 0) # Randomly select a cell in the north most row.
  starting_cell = maze.cell(starting_cell_loc)
  starting_cell.remove_wall(Direction.NORTH) # Create an opening in the maze
  maze.starting_cell = starting_cell #Saving a pointer for visualization and and solving.

  # Establish the target cell. This is the exit of the maze.
  exit_cell_loc: Point = Point(random.randint(0, maze.width - 1), maze.height-1) # Randomly select a cell in the South most row.
  exit_cell = maze.cell(exit_cell_loc)
  exit_cell.remove_wall(Direction.SOUTH) # Create an opening in the maze for the exit.
  maze.exit_cell = exit_cell #Saving a pointer for visualization.

  starting_cell.visit()
  stack.push(starting_cell)

  while not stack.empty():
    current_cell = stack.pop()
    neighbors: Dict[Direction, MazeCell]  = maze.find_neighbors(current_cell)

    # Filter out None and visited neighbors.
    unvisited_neighbors = dict(filter(lambda n : n[1] is not None and not n[1].visited, neighbors.items()))
    if len(unvisited_neighbors) > 0:
      # Randomize which unvisited neighbor is traversed next.
      pick_cell = random.randint(0, len(unvisited_neighbors) - 1)
      unvisited_neighbor: List[(Direction, MazeCell)] = list(unvisited_neighbors.items())[pick_cell]

      # Remove the wall between the current cell and the chosen cell.
      wall_to_remove = unvisited_neighbor[0]
      unvisited_cell = unvisited_neighbor[1]
      current_cell.remove_wall(wall_to_remove)
      unvisited_cell.remove_wall(DIR_OPPOSITES[wall_to_remove])
      unvisited_cell.visit()

      # Save the current cell for further exploration (backtracking...)
      stack.push(current_cell)

      # Save the unvisited neighbor for further exploration.
      stack.push(unvisited_cell)
Drawing the Maze#
Now that we’ve generated a maze in memory we just need to draw it. I opted to just visit every room in the maze and draw any walls each room has. Here is the code to do that.
def draw_wall(canvas: Canvas, start: Corner, stop: Corner) -> None:
  """Draws a single wall."""
  canvas.move_to(start.x, start.y)
  canvas.line_to(stop.x, stop.y)
  canvas.stroke()

def draw_cell_walls(cell: MazeCell, canvas: Canvas, room_size_width: int, room_size_height: int, color='black') -> None:
  """Draws all of the walls in a maze cell."""
  canvas.begin_path()
  canvas.stroke_style = color

  cell_index,row_index =  cell.location.x, cell.location.y
  upper_left_corner = Corner(cell_index*room_size_width, row_index*room_size_height)
  upper_right_corner = Corner(upper_left_corner.x + room_size_width, upper_left_corner.y)
  lower_right_corner = Corner(upper_right_corner.x, upper_right_corner.y + room_size_height)
  lower_left_corner = Corner(lower_right_corner.x - room_size_width, lower_right_corner.y)

  if cell.north: draw_wall(canvas, upper_left_corner, upper_right_corner)
  if cell.east: draw_wall(canvas, upper_right_corner, lower_right_corner)
  if cell.south: draw_wall(canvas, lower_right_corner, lower_left_corner)
  if cell.west: draw_wall(canvas, lower_left_corner, upper_left_corner)

  return

def draw_maze(maze: Maze, canvas: Canvas) -> Canvas:
   """Draws the entire maze."""
  room_size_width: int =  20
  room_size_height: int = 20

  with hold_canvas(canvas):
    canvas.line_width = 5
    for row_index in range(maze.height):
      for cell_index in range(maze.width):
        cell = maze.cell(Point(cell_index, row_index))
        draw_cell_walls(cell, canvas, room_size_width, room_size_height)

   # Draw the first cell in red, to highlight where the entrance is.
   draw_cell_walls(maze.starting_cell, canvas, room_size_width, room_size_height, 'red')
  return canvas;
If we run all of the code we should now see something like the below image.

Once again, if you want to play with the full code, you can grab it here.
Review: Why was this hard?#
To summarize, I initially set out to draw a 2D randomized maze using an established algorithm that can be written on the back of a napkin. How long did it take me? Around 15 hours. How’s that possible?
The time breaks down like this:
- I only have about 90 minutes a day to work on this. So it’s hard to get into a productive flow. Time was spent each time just reviewing what I’d done the day before.
- For this project I really wanted to use VSCode’s native integration with Jupyter Notebooks. However the combination of Poetry, iPyCanvas and VSCode just wasn’t working very well. I spent 8 to 10 hours researching how to make those tools play nice.
- I spent around 3 hours actually writing code. About a 3rd of that was rewriting to make the code more organized and readable.
I’ll highlight that again. I spent ~67% of the total effort fighting to make the tools work together. Even though I already knew the language, the problem domain, and the tools; I burned a large chunk of time just bootstrapping the project. I’ve been at this for over 20 years…
I’m hammering on this to make a point. Programming is hard. It’s hard for a bunch of reasons. As you’re trying to learn don’t feel bad if something takes longer than you think it should.
Until next time.
- Sam